

Within NetApp’s ONTAP software there’s the ability to monitor NAS actions via functionality called FPolicy. It’s essentially a notification framework that’s built around the logging and notification of actions against SMB/CIFS and NFS shares. The real power of FPolicy comes to light when you partner it with an off-system engine like Varonis or Cloud Secure, opening the door to all kinds of smart security controls. Native on-system FPolicy functionality is comparatively limited. While the framework is active and feeds info back into the other areas like logging, it lacks the majority of feature rich components an off-system partner provides.
One thing native FPolicy can quickly do is block file extensions. This is great for preventing uncouth users from doing things like storing their Celine Dion FLAC collection, or preventing malware from operating successfully. Most ransomware software bundles change file extensions during the encryption process. By blocking known extensions you can throw a wrench in the process. Note, this is a layer of the security onion, it doesn’t help prevent attacks that do not change the extension or those that exfiltrate data.
You can also block general malware extension types, but a lot of malware hides behind known and important extensions. Though you can justify this by saying, “don’t store .exe or .dll files in general purpose network shares.”
It’s worth noting that native FPolicy won’t throw an alert whenever there’s an action blocked by policy. Another benefit to off-system management.
While this is already covered in another of my posts here, and inspired by Matt Trudewind’s blog here, I figured a standalone post would provide better focus and allow me to cover some System Manager functionality that’s not widely known.
8/24 Minor Update – I’m just trying to create a tech resource here using the most colloquial terms. Whitelist, blacklist, allow list, deny list, inclusion list, exclusion list, whatever works for you. Not trying to wade into the shit show that is 21st American politics.
A Forenote on Extension Management
Blocking known malware extensions isn’t a once and done thing. As new variants hit the web, and organizations customize existing malware, the list will continue to grow. You’ll want to regularly review the list using reference sites like this or this.
It’s smarter, though more troublesome, to whitelist known extensions. Sharply defining what’s allowed can be a pain for you and your users but the result is a smarter security posture. Work with your users and application owners to determine what extensions to whitelist. It helps to run a data gathering tool that can report on extension types if it’s an existing workload. You probably won’t capture them all up front so make sure to let your admins and help desk folk know there’s an existing approval whenever a user calls to complain that they get an error when writing a .rle or whatnot.
CLI Configuration
The best and most customizable way to configure FPolicy is by running a few commands via ONTAP CLI. The workflow is straight forward: create a policy for an applicable SVM, configure the policy, set the scope (define the relevant extensions to exclude or include), and apply.
Make sure to copy and save these commands. Policies exist at the SVM level and you’ll have to follow the same workflow for every SVM.
Create a FPolicy event:
In this example only a CIFS policy is created. You can also apply nfsv3 or nfsv4 rules.
set advanced -c off
vserver fpolicy policy event create -vserver <SVM Name> -event-name <Event Name> -protocol cifs -file-operations create,open,rename
Create a Fpolicy policy:
“Native” is the on-box FPolicy engine. If you were running a workflow for an external configuration the engine name would be something like “varonis.”
vserver fpolicy policy create -vserver <SVM Name> -policy-name <Policy Name> -events <Event Name> -engine native -is-mandatory true -allow-privileged-access no -is-passthrough-read-enabled false
Define the policy scope:
Use the -file-extensions-to-include and/or -file-extensions-to-exclude flag appropriately, where include blocks extensions and exclude allows them.
In my testing the sequence-number is the order of operations through which policy permissions pass, but each layer is totally restrictive. If my first policy says to block everything, and the second policy says to allow txt, then txt files will be blocked with everything else. If the first policy says to allow txt, and the second policy says to block everything, then txt files can be created but everything else is blocked.
When creating a whitelist it’s easiest to define a single policy with -file-extensions-to-include= “*” to block non-excluded extensions and have an exclude definition on what to allow.
vserver fpolicy policy scope create -vserver <SVM Name> -policy-name <Policy Name> -file-extensions-to-include <Comma Separated List of Extensions> -shares-to-include "*" -is-file-extension-check-on-directories-enabled true
Enable:
vserver fpolicy enable -vserver <SVM Name> -policy-name <Policy Name> -sequence-number 1
To check out the policy later you can run:
vserver fpolicy policy scope show -vserver <SVM Name> -instance
vserver fpolicy show -vserver <SVM Name>
There are a lot of additional configuration options not documented here, including the ability to include/exclude specific volumes are shares. At the event level you can dictate different rules depending on the protocol such as preventing CIFS rename director operations. None of that is specific to the scope of this article, but I bring that up because at least one person is going to ask about advanced FPolicy configs…
API Configuration
Setting up FPolicy via API is also pretty easy thanks to a dedicated module. I’m not going to go through the whole process here simply for the sake of an already long post. Luckily the reference documentation is pretty straightforward. You can access a better version of the API reference via https://<yourcluster>/docs/api/
Look for Doc /protocols/fpolicy and subset. All the same principals that went into the CLI will apply here, just a different orchestration methodology.
Here’s a quick expert of body for reference,
"scope": {
    "include_shares": [
        "sh2",
        "sh3"
    ],
    "exclude_shares": [
        "sh1"
    ],
    "include_volumes": [
         "vol1",
         "vol2"
    ],
    "exclude_volumes": [
        "vol0"
    ],
    "include_extension": [
        "pdf"
    ],
    "exclude_extension": [
        "txt",
        "png"
    ]
}
System Manager Configuration
At some point, with the release of 9.11.1, came the ability to configure white/black listing of extensions through System Manager. Problem is, I don’t think anyone knew about it and, frankly, it’s pretty half assed like many things in the GUI. Hell, I can’t find anything via a cursory Google search. Nor can you find anything when using the search functionality within System Manager…
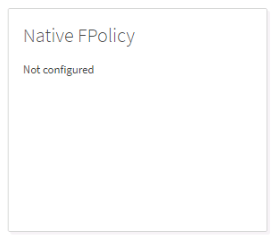
Go into Storage VMs (SVM), click one, then go to the Settings Tab, then scroll down to the Security section. Here you can see a section to set up Native FPolicy… psych! That’s just for show right now, nary a configuration icon to be found.
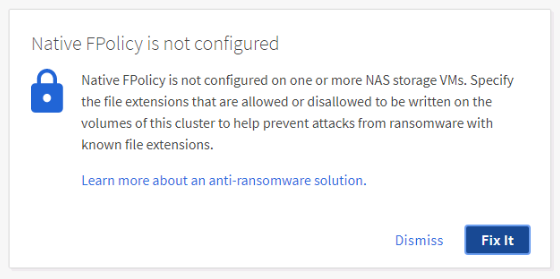
Instead what you want to do is go to Insights on the left hand menu, and look for the “Native FPolicy is not configured” widget. You have to mouse-over to see the Fix It button (another poor GUI design choice), clicking it will open a nifty wizard.
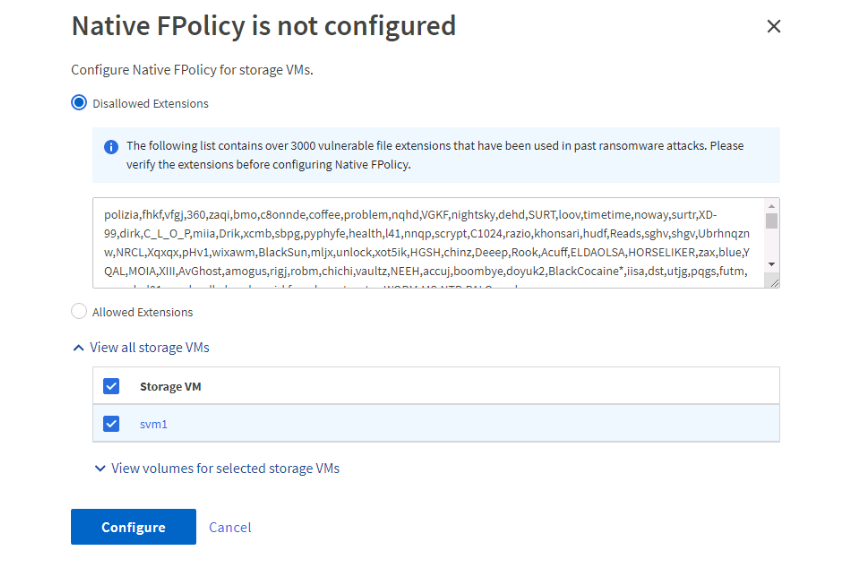
Here you can set up a blacklist with over 3000 pre-configured extensions, or check the radial for Allowed Extensions and set up a whitelist. As far as I’m aware the pre-configured list has no automatic update cycle through NetApp so you’ll want to treat it like any customer created list.
If you click the drop down arrows you can exclude individual volumes from the policy.
Once you click configure the widget will disappear, now you can go back to the SVM configuration and find an arrow in the FPolicy widget. Click it and you’ll see the policy that was created and applied.
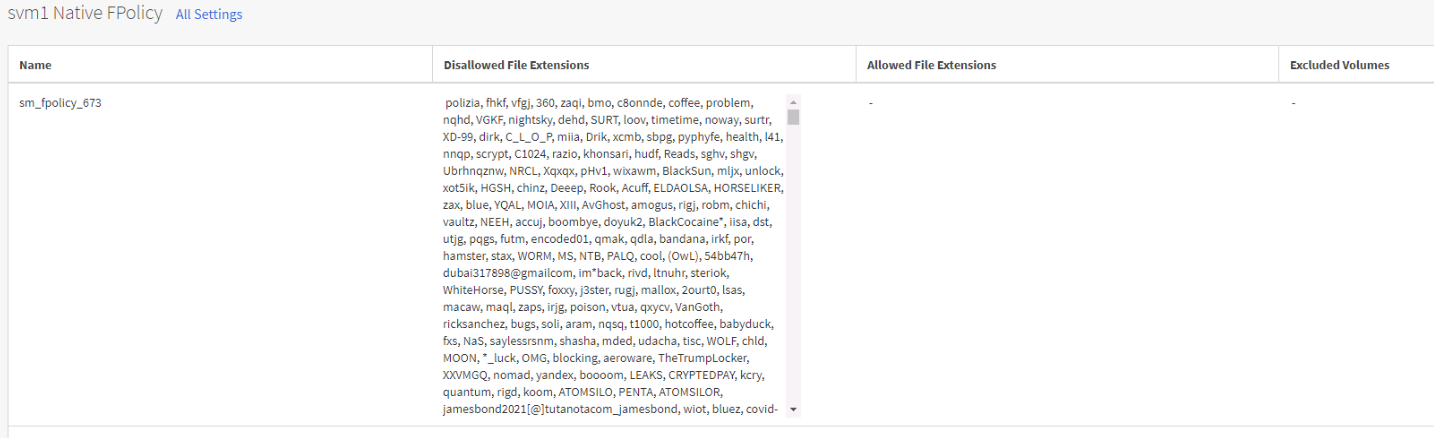
No, you cannot disable or edit the policy. If you create a new SVM you have you repeat the process via a new Insights widget that appears.
At this point you’re probably saying to yourself, “well that’s fucking useless,” and you’d be right. Did I not say that CLI was the best way to configure this? I guess the idea was to push some low hanging fruit for an admin to see and action all. I’ll update this in a few weeks if 9.12.1 brings anything new to the table.
Additional Reference Material
- Matt Trudewind’s blog on configuring FPolicy
- NetApp KB on FPolicy
- NetApp’s Doc Site on all things FPolicy (I can’t figure out how to just link to the header of the section, instead of the first portion of a log of content)
Post History
- Oct 24, 2022 – Initial Publication