
Intro
Welcome to my quick guide on deploying NetApp’s ONTAP Cloud into AWS (Amazon Web Services).
If you’re unfamiliar with the product, ONTAP Cloud is NetApp’s ONTAP software, as see on FAS and AFF equipment for many years, now available in AWS and Azure. By running ONTAP Cloud you can gain the same efficiencies and software features available on a traditional hardware platform in your cloud infrastructure. There are many benefits of presenting storage via ONTAP Cloud, such as using its deduplication abilities to lower costs and SnapMirror to easily replicate data between hyperscalers.
Every ONTAP Cloud deployment starts with OnCommand Cloud Manager. OnCommand Cloud Manager is a bit of software that allows you to deploy and manage ONTAP Cloud instances. OnCommand Cloud Manager can be installed local to your site, or up in the cloud along side your ONTAP Cloud instances. Typically it’s best to run it in the cloud along side your ONTAP Cloud instances so that a network disconnect to your data center or other cloud environment does not impact management capabilities.
For AWS deployments of ONTAP Cloud the road map is quite simple…
- Verify AWS environment
- Deploy OnCommand Cloud Manager
- Deploy ONTAP Cloud
Note that this article is for reference only, as procedures and best practices are subject to change. Always consult with NetApp or NetApp partner for the most up to do date info. Best practices for cloud and application security should always be considered in addition to the steps within. That’s a very important aspect that I’m not fully covering here.
This document is currently in version 1.3, last update Jan 4th, 2018.
Procedure Video
Before starting I recommend watching this video from NetApp which runs through the deployment process. It’s pretty quick, does a great job at summarizing the process, but leaves out some of the important steps covered in this guide.
Limitations
As of this revision, there are some limitations for ONTAP Cloud deployments. Be sure to consult the latest release notes for finer details.
ONTAP Cloud 9.2 For AWS
- 368 TB max raw capacity, 360 TB for nodes in a HA pair (dependent on instance & license)
- Maximum of 46 aggregates per system 18 aggregates for nodes in a HA pair, 96 TB max aggregate size, maximum usable of a 96 TB aggregate is 85.05 TB
- Up to 2 billion files per voume
- 500 FlexVol volumes per node, 76.55 TB of fully provisioned capacity per FlexVol
- 255 snapshot copies per FlexVol
- High availability environments supported across Availability Zones
- ONTAP Cloud managed encryption is supported (however encryption is not supported on m3 instances)
Installation
Step 1 – Prep Your AWS Environment
Before installation can begin you need to ensure your AWS infrastructure is ready for deployment. Here are some of the basics,
- Ensure your AWS environment meets security best practices. Secure your cloud!
- OnCommand Cloud Manager and ONTAP Cloud systems must reside in a VPC where at least one subnet has outbound internet access. ONTAP Cloud instances can reside on a private subnet leveraging a NAT for internet access.
- If deployment OnCommand Cloud Manager and ONTAP Cloud in different subnets/networks, those networks must be able to communicate (they need to be able to talk to each other).
- Configure VPN connections for any communication between external ONTAP Cloud connections (e.g. from local ONTAP environments, or to other ONTAP Cloud environments).
- To keep costs down, ensure any ONTAP Cloud instance resides in a VPC with an endpoint to S3 allowing you to use Fabric Pool tiering
Before getting started I highly recommend you read the following documents from NetApp. For the purpose of this guide I assume that your AWS foundation is solid as just jumping right in can lead to all kinds of issues later on.
- Planning your ONTAP Cloud configuration
- AWS Networking Requirements
- AWS Networking Requirements for ONTAP Cloud HA in multiple AZs
- Sample VPC Configurations
- Setting up AWS billing and cost management for Cloud Manager
If you’re planning to implement encryption please read the following…
- Ways to encrypt ONTAP Cloud data in AWS
- Key Manager requirements for ONTAP Cloud encryption
- AWS Key Management Service Requirements
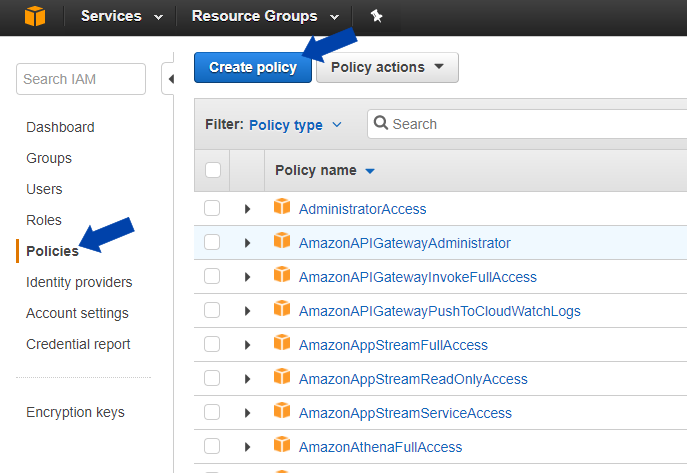
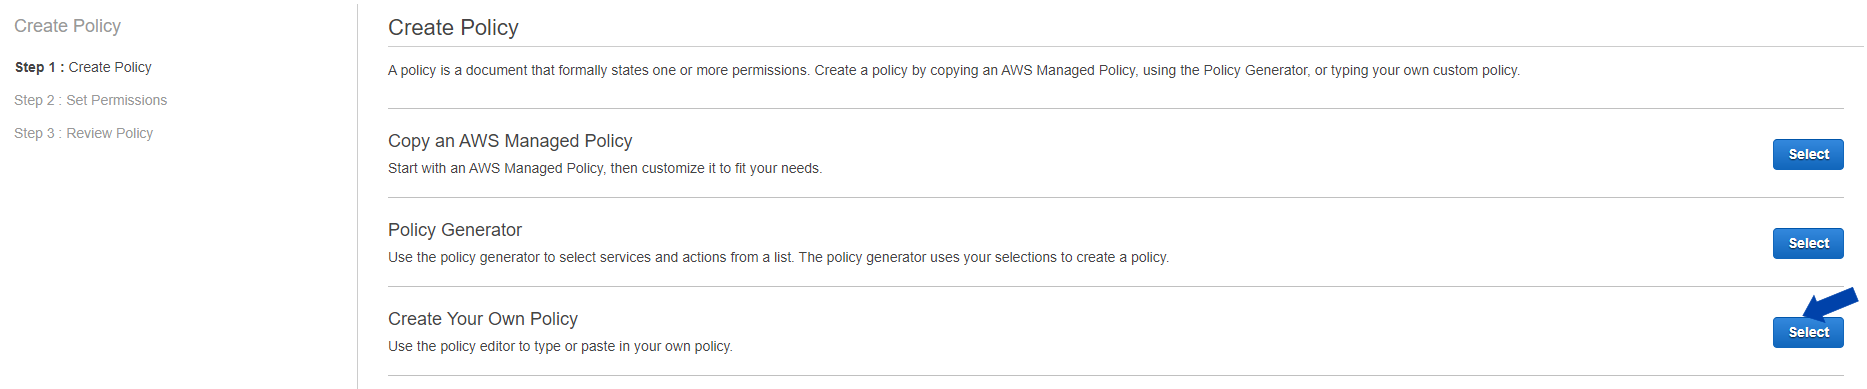
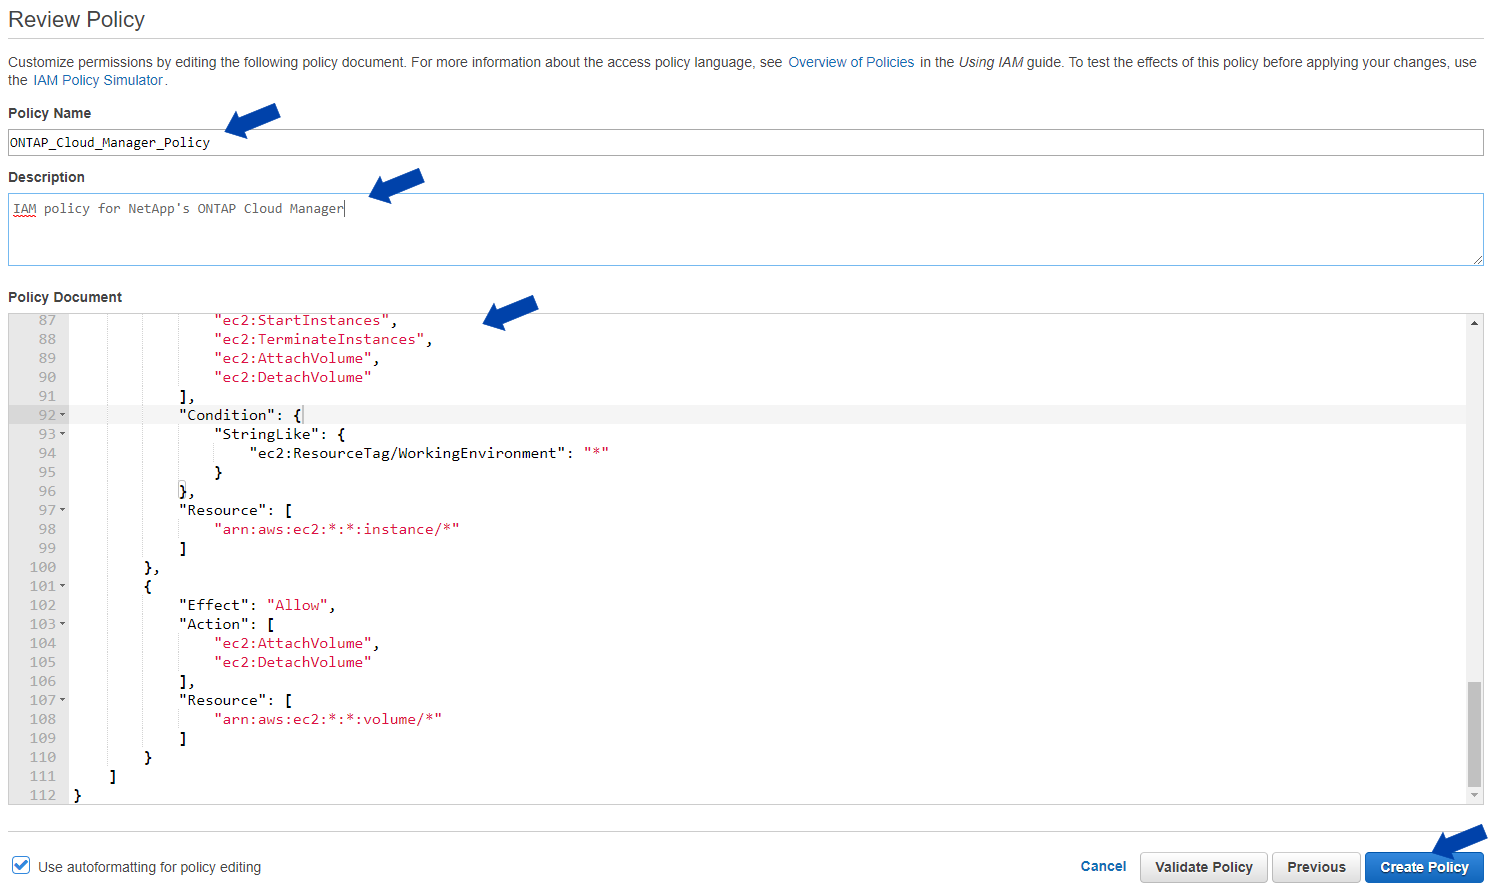
Step 1.1 – Download/copy the latest Cloud Manager IAM policy and create one for use in your AWS environment. In IAM go to policies and create your own. Enter in a name, description, and the JSON formated policy.
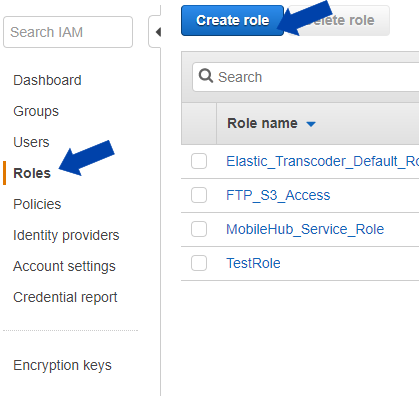
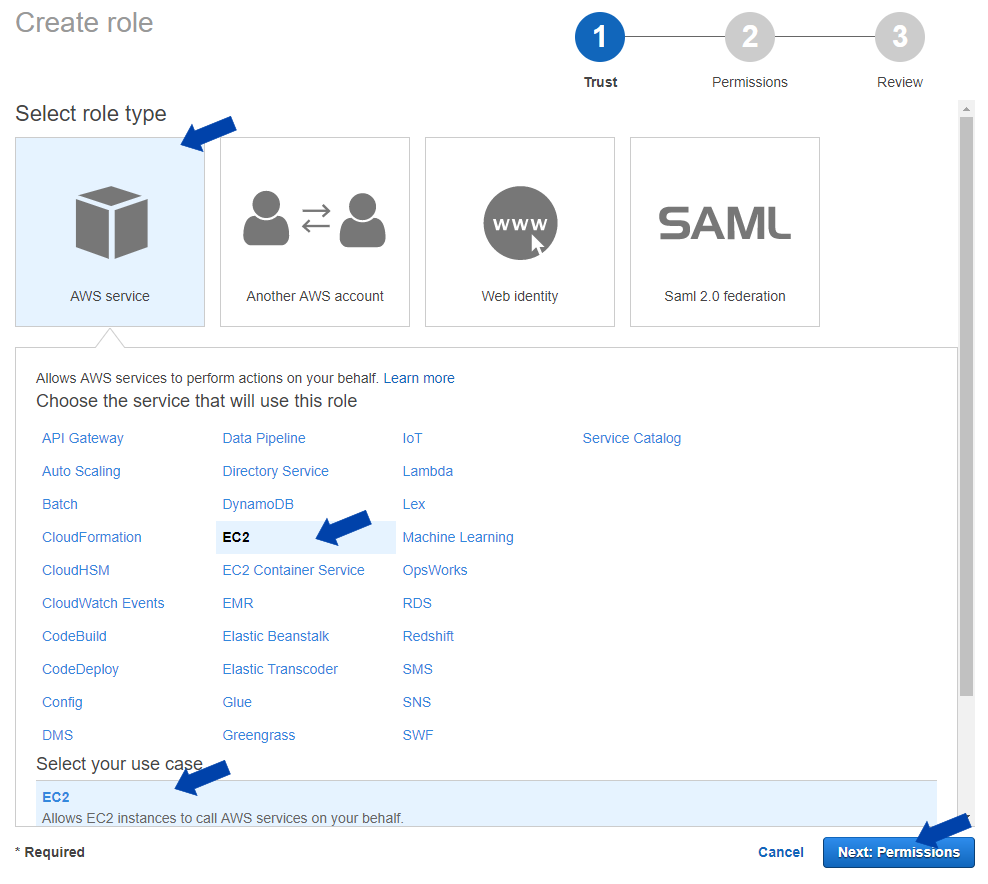
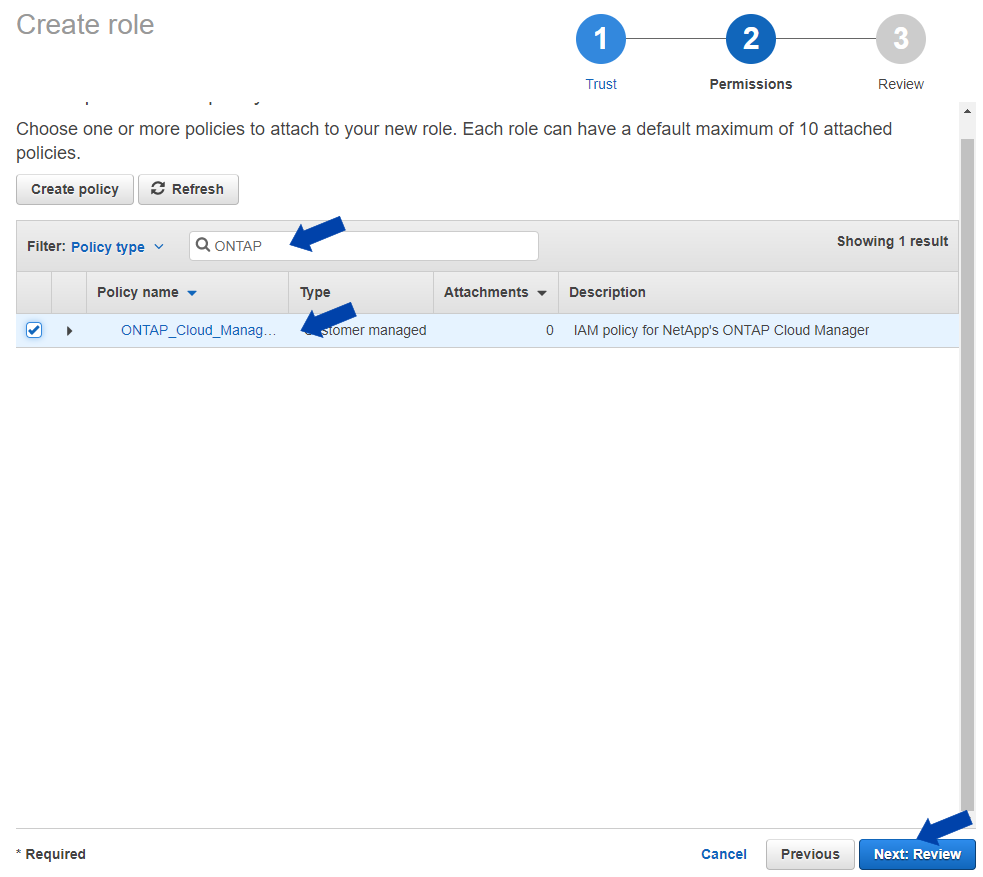
Step 1.2 – Once the policy has been created you need to create a role, type “Amazon EC2,” and attach the policy. At the end of the wizard you’ll want to give it a descriptive name and description.
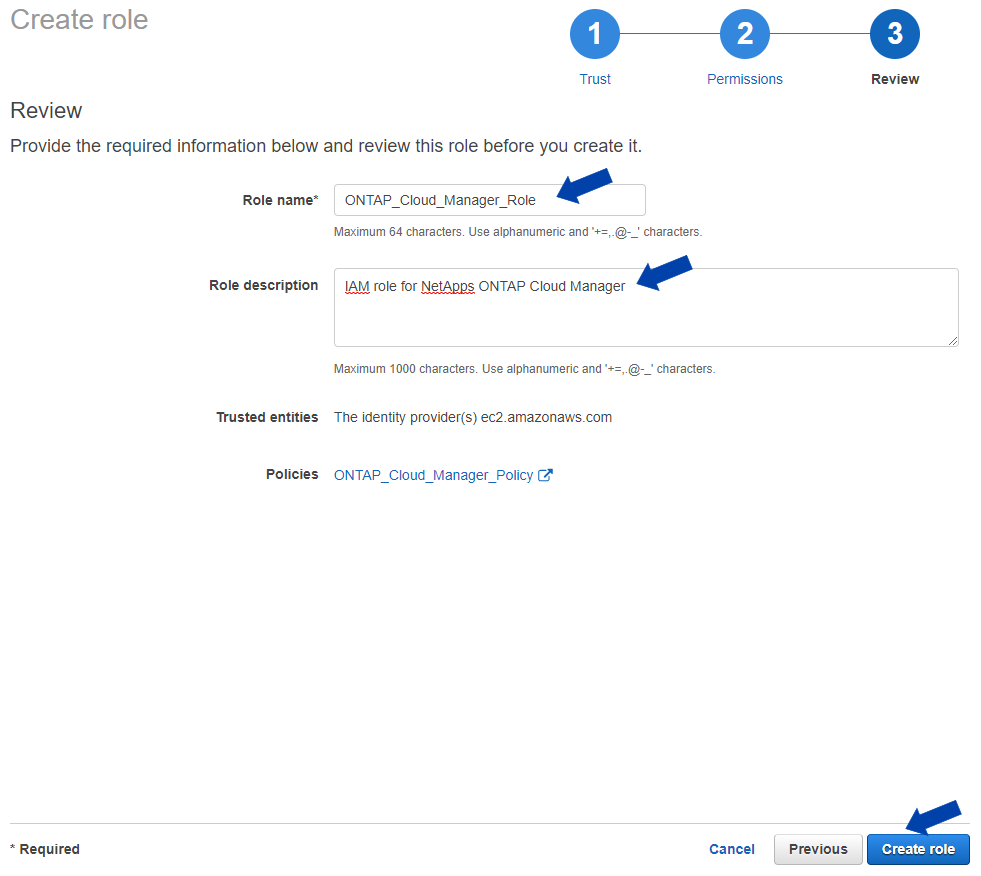
All done!
Yeah, the prep was that easy.
Step 2 – Install OnCommand Cloud Manager
Once you’ve got AWS all set, it’s time to install OnCommand Cloud Manager.
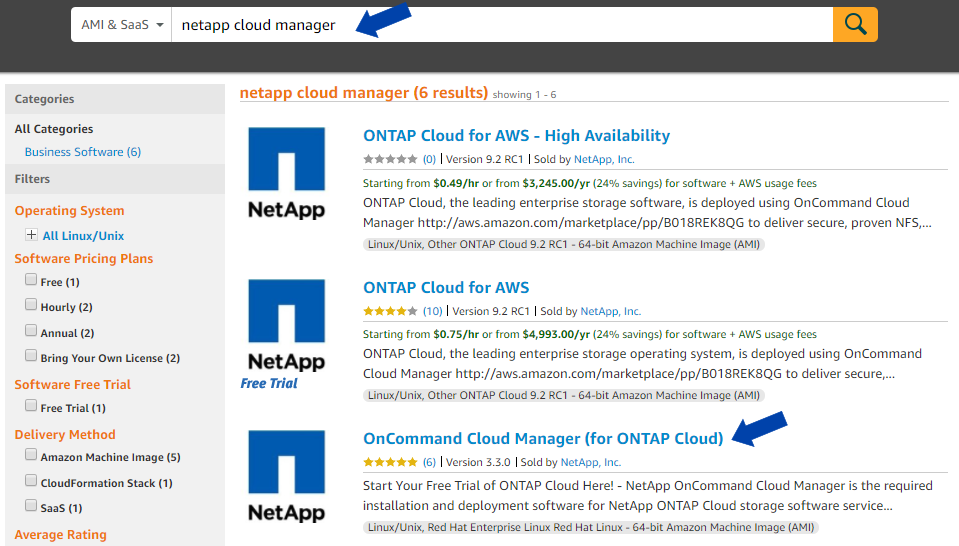
Step 2.1 – Head on over to the AWS Marketplace and search for NetApp Cloud Manager. The results are pretty crowded but you want to find OnCommand Cloud Manager (for ONTAP Cloud). Click continue in the listing and head into the Manual Launch wizard.
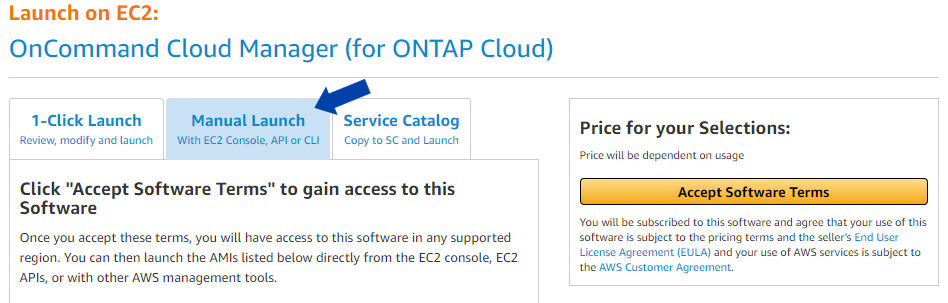
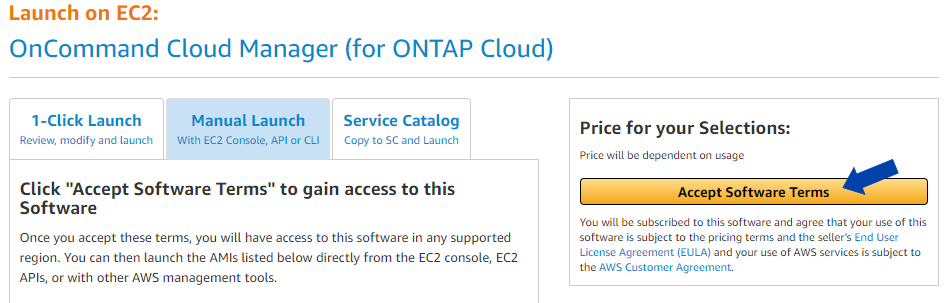
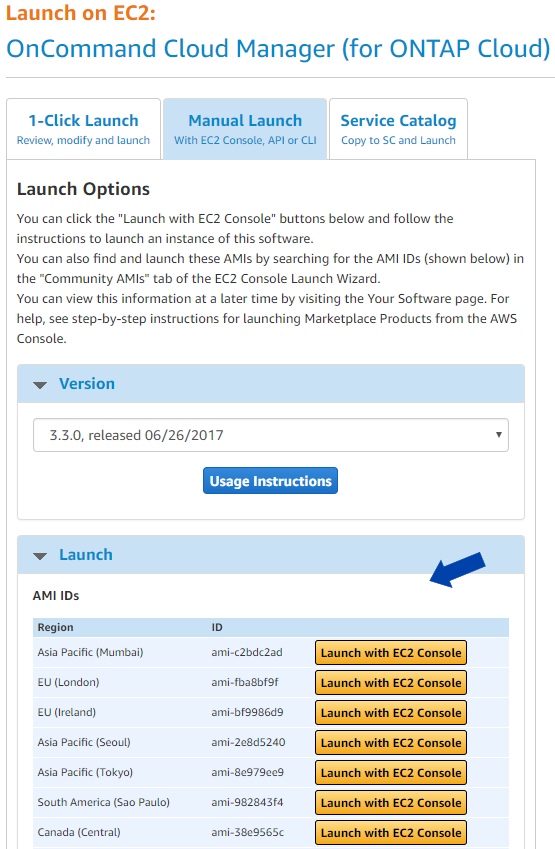
Step 2.2 – To start working through the Manual Launch wizard first select Accept Software Terms on the right side. Once that’s complete you’ll end back on the launch screen and your region based launch buttons will now be enabled. Select the Launch with EC2 Console button next to the region you would like to deploy into to continue.
Step 2.3 – Time to walk through the EC2 Launch Wizard. As you make your way through configure the following…
- Instance Type
- Typically t2.medium and m3.large are available, I’m not aware of any performance requirements for OnCommand Cloud Manager so the cheaper t2.medium instance is the way to go.
- Configure Instance
- Choose your network
- Choose the IAM role you created previously
- Add Stroage
- Nothing to configure here
- Add Tags
- Add tags if you’re using them
- Configure Security Group
- Create a new group making sure you have 0.0.0.0/0 rules for SSH, HTTP, and HTTPS. Mine auto populated.

When things are all set it’s time to click Review and Launch. Select an existing key, or create a new one and save, before finishing completely.
In about 5 minutes your instance will be good to go once the Instance State is running and the Status Checks are 2/2. Grab the public IP for the instance and proceed to the next step.
Step 2.4 – Setup OnCommand Cloud Manager
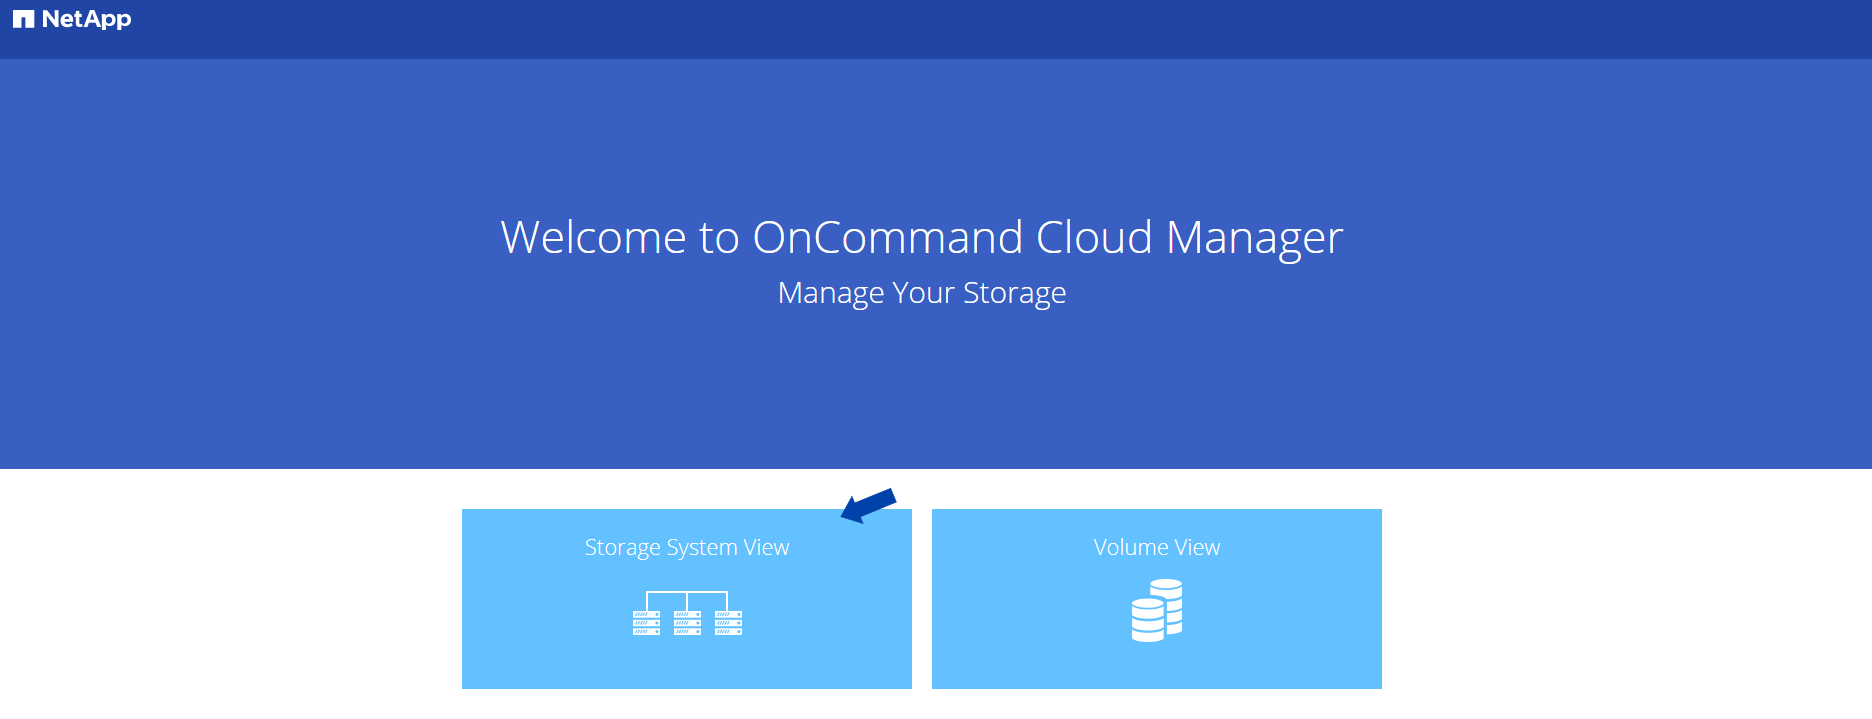
With the the instance IP’s public IP in hand, enter it into a browser and select Storage System View to configure OnCommand Cloud Manager.
Waling through the wizard, start with Set up new Cloud Manager.
- Enter Site and Company Information
- Create a new admin user for cloud manager
- Confirm that Cloud Manager uses the proper IAM role
- Configure an AWS Cost S3 Bucket
- This is an optional step that will allow you to see the AWS cost data of AWS payer accounts, where Cloud Manager saves cost data to an S3 bucket for reference. Click here for more information.
- Tenant Informaton
- NetApp Support Site credentials (optional, but you’ll need this for licensing and support services)
- Automatically Upgrade (Recommended)
- That you’ve read and approve the user agreement
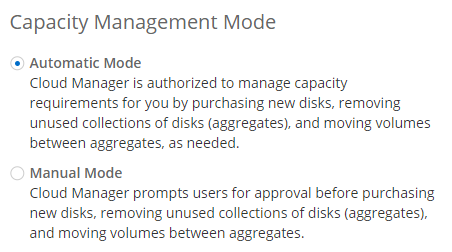
- Capacity Management (this can be changed at any time)
- Automatic manages storage for ONTAP Cloud (purchasing more storage, deleting unused disks, and moving volumes between disks)
- Manual requires user access before any of the prior actions can take place
In about 5 minutes the configuration will finalize and you’ll be all set to start deploying ONTAP Cloud instances.
Take some time to get to know the GUI. Note the cool chat in the lower right hand corner that should pop up with the latest updates each time you log in. You can actually use that to chat and ask questions if any should arise. It’s 24/7, but the team is dispersed and you may not get a prompt response on evenings and weekends.
Working environments consist of one or more ONTAP Cloud instances and can even expand to local ONTAP environments.
Tenants, like the one you created earlier, are used to isolate working environments. Users can be created under each tenant to isolate access, allowing different groups to provision and manage their own ONTAP environments. You can read more about tenants here.
The timeline is basically a log of all events within the system.
Step 3 – Deploy ONTAP Cloud Working Environments
As with most things, before we can deploy ONTAP Cloud, there are some preliminary work and considerations to consider.
Build out the appropriate VPC for each working environment per your organization’s practices (since my test environment is pretty basic I placed it in the same VPC set up during the Cloud Manager install). Note that the OnCommand Cloud Manager instance will need network connectivity to the target VPC and the ONTAP Cloud instance will need outbound internet access (namely for licensing and support services). You don’t need to configure a new security group, the deployment wizard will take care of that for you. AWS networking requirements can be found here and the security group rules can be found here.
It’s also important to understand the licensing model and underlying instance sizes. You’ll need to know this during the provisioning process so now’s a good time to plan if you haven’t already. You can read more about the licensing and sizes here.
If, down the road you need to change the size of your ONTAP Cloud VM, you can do that though it will be a disruptive change. A set of allocated drives in an aggregate cannot be change on the fly though. If you have additional supported capacity on the VM you can instead add a new aggregate with new drives and non-disruptively move the volume over. If you don’t have any additional room on the VM you can stand up a new ONTAP Cloud VM and SnapMirror the data over efficiently. There’s also a configuration option that affects write speed which changes how ONTAP responds to writes. If write speed is set to normal incoming writes will be written on the disk before acknowledgement is returned. If write speed is set to high those writes will be acknowledged when they hit the system memory. Writes to memory are a lot faster, but this being a virtualized environment, there is no battery backup for the cache. This means that a service disruption could result in data loss. NetApp has a brief article on write speed here. Good news is that you can change this later, though it will require an outage.
Ready to get started?
Step 3.1 – Start the Deployment Wizard
In Cloud Manager go to Working Environments and select Add Environment. While you can deploy Azure instances from an AWS based OnCommand Cloud Manager, I’m only going to cover the AWS side in this article.
Work your way through the wizard entering the following information…
- Environment Name (numbers and letters only)
- Tags (optional)
- Admin password
- Region
- VPC
- Subnet & Security Group (Existing or newly generated)
- Data Encryption
- None, ONTAP Cloud Managed, or AWS Managed
- BYOL License (it’s like saying Automatic Teller Machine Machine)
- If not BOYL, you can choose from the list of default pay-as-you-go packages for customize your own
- NetApp Support Site credentials
- EBS Volume Types
- Provisioned IOPS SSD (io1)
- Genreal Purpose SSD (gp2) (Required for Fabric Pool S3 tiering)
- Throughput Optimized HDD (st1) (Required for Fabric Pool S3 tiering)
- Cold HDD (sc1)
- (You can find out more on the various volume offerings here)
- Disk Size
- Write Speed
- Create a volume (optional)
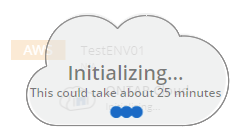
Give everything one last review and start the process. In about 25-30 minutes you’ll have a new ONTAP Cloud environment to enjoy.
Step 4 – Deploy ONTAP Cloud High Availability Environments
In addition to standing up a single ONTAP Cloud instance you can also stand up High Availability (HA) environments featuring multiple instances. HA environments allow for an additional layer of resiliency, because let’s face it, the AWS does go down sometimes.
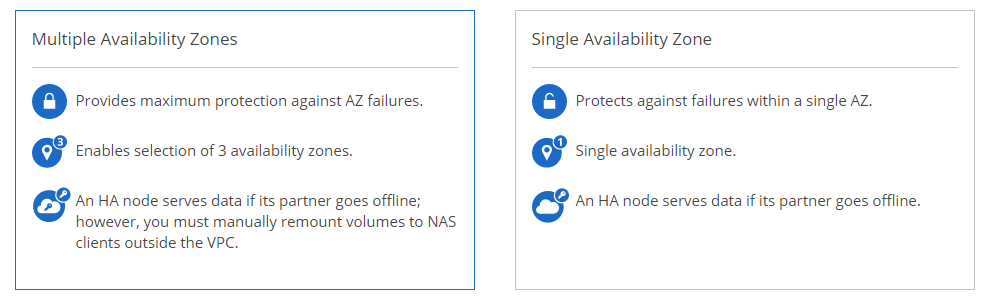
Within AWS there are two HA configuration options. The first builds ONTAP Cloud instances across multiple Availability Zones (AZ) while the second builds them within a single AZ. For those unfamiliar, an Availability Zone is a distinct area within an AWS region. Looking at things from a geographical prospective, regions are pretty straight forward, US East is located in Northern Virginia. But within Northern Virginia there are various data centers spread out, each one being a separate AZ (there might even be different AZs under the same roof but backed by independent physical resources). This gives you added resiliency in case a storm knocks out the power (which did happen in 2012).
Multi AZ HA environments are the most resilient of the two options. In this configuration three AZs are used, an ONTAP Cloud instance in one, an ONTAP Cloud instance in a second, and in the third AZ a mediator. This mediator watches the health of each instance and initiates a fail over if an issue is observed. “This configuration uses two types of IP addresses for NFS and CIFS data access. For client access within the VPC, it uses floating IP addresses that migrate between HA nodes if failures occur. Separate IP address are required for clients that are outside of the VPC. These IP addresses are static — they cannot migrate between nodes. If a node goes offline, you must manually remount volumes to clients outside the VPC bu using the other node’s IP address. When the failed node comes back online, you must remount using the original IP address. ONTAP Cloud uses multipath I/O (MPIO) and Asymmetric Logical Unit Access (ALUA) to provide high availability for iSCSI. Floating IPs are not required.”
The single AZ HA environment gives you resiliency only in the event of an ONTAP Cloud instance failing. “Because this configuration is in a single AZ, it uses one set of IP address for NFS and CIFS data access from within the VPC and from outside the VPC. These IP addresses automatically migrate between HA nodes if failures occur.”
Note when deploying a Multi AZ environment you’ll need to provide those floating IP addresses and make sure that you have a subnet in each AZ for the VPC.
Whether in one AZ or multiple you’ll also have to ensure that the mediator has access to the internet either via public IP address, proxy, or NAT gateway.
NetApp’s official HA deployment guide can be found here.
Deploying a HA environment is similar to a stand alone instance with some key differences.
Step 4.1 – Start the Deployment Wizard for ONTAP Cloud HA
Step 4.2 – Select which HA scheme you would like to deploy
Step 4.3 – The next screen will depend on which option you selected.
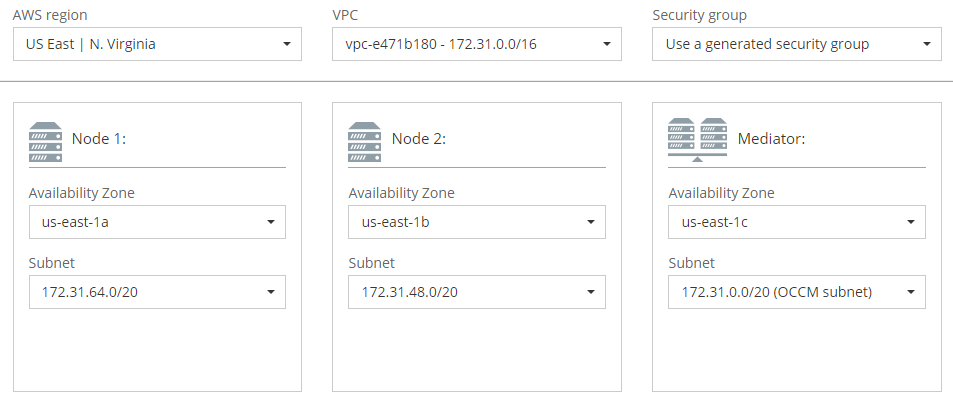
Multi AZ 1 – If you selected to deploy across multiple Availability Zones you’ll see the following. Select a region, VPC, and security group. Under that you’ll select the AZ and subnet for each of nodes. AZ options will vary depending on the region.
Multi AZ 2 – On the next screen you’ll enter the authentication method for the nodes along with the key pair & internet connection method for the mediator. The latter is required so it can directly talk to AWS services to assist with a failover. Options here include public IP address proxy, or NAT gateway.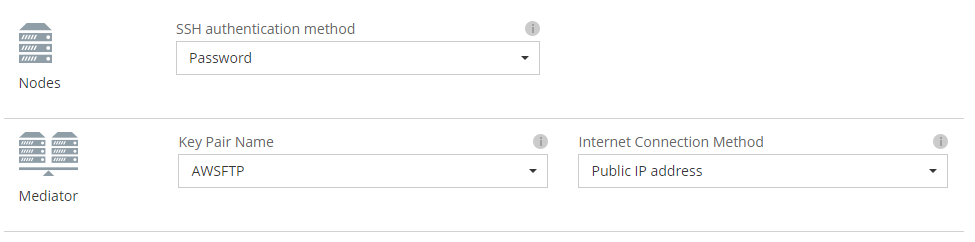
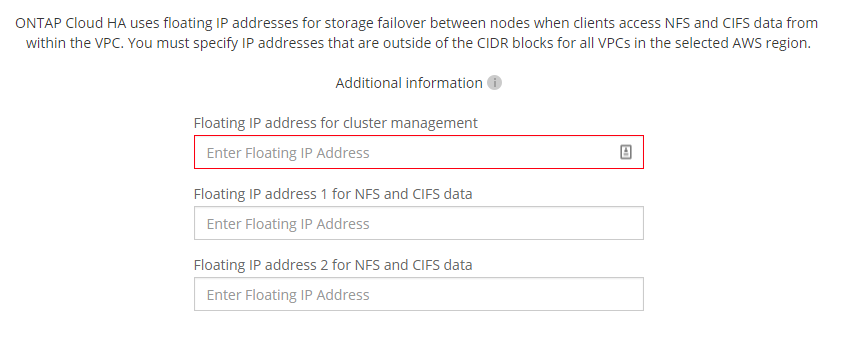
Multi AZ 3 – Next you’ll want to enter a floating IP address for management, and two for NAS services.
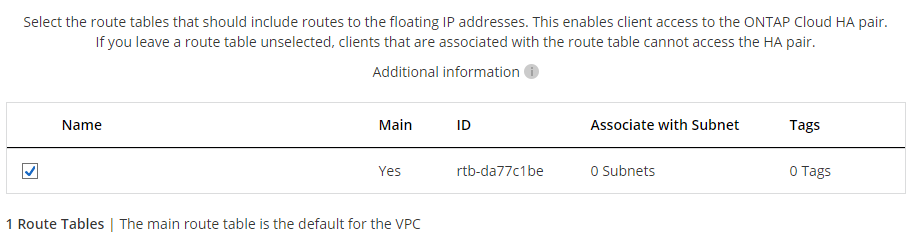
Multi AZ 4 – Next up you’ll want to select the route tables for the floating IP addresses.
After which you’re back to the same steps as a stand alone instance, encryption, storage, instance types, etc.
Single AZ 1 – The process for setting up a single AZ HA environment is a mix of the single deployment and the HA deployment. After you select the region and AZ you’ll be asked for the SSH authentication method and mediator key pair & internet connection method options.
After which you’re back to the same steps as a stand alone instance, encryption, storage, instance types, etc.
25 minutes or so later you should have a brand new HA environment to enjoy. I haven’t spent too much time with HA pairs but my understanding is that you manage a pair just like, and as simply, as if it were a single instance.
Now What?
So you’ve got OnCommand Cloud Manager installed, and your first instance of ONTAP Cloud… now what? Well in addition to sharing out storage here are some of the cool features available…
- Allocate new storage
- Schedule ONTAP downtime – Shut the system down when you don’t need it to save money
- Manage replication
- Upgrade – Requires NetApp Support Site credentials
- Change the VM or license type – Outage required for VM changes
- Back up your Cloud Manager environment
- Disassociate working environments – So you can discover them into another OnCommand Cloud Manager
Helpful Documentation
- NetApp’s Getting Started with ONTAP Cloud in AWS – Basically everything I’ve said here, but officially stated
- Planning your ONTAP Cloud Configuration – A ‘read me’ must that covers some of the design decisions that will impact your environment
- Launching an ONTAP Cloud HA pair in AWS – Official step-by-step for deploying an HA pair
- OnCommand Cloud Manager Documentation Center – Quick stop for all things OnCommand Cloud Manager related
- OnCommand Cloud Manager Release Notes – 3.4 currently published (as of my last update to this guide)
Special thanks to Kevin Hill at NetApp for giving me a few pointers and a much needed proofread!