

First off, this post is thanks to my mate Charles. He wrote most of this up for his customers and I asked if I could snag it, throw my spin on it, and share it here. A lot of this comes from TR-4569, Security Hardening for ONTAP. That should be your go-to source for security on ONTAP. There’s also TR-4572, The NetApp Solution for Ransomware, which is sadly light on details and out of date.
There’s also a pretty nifty video from Insight 2020 that covers a lot (I’ll even reference it later).
This post is more ransomware concern forward. It’s something I’ve seen many of my customers encounter to various degrees of heartache. Taking some of these steps here can potentially reduce the impact of those attacks greatly. And, have no doubt, it’s not a matter of if you get hit by ransomware, it’s a matter of when.
I’d also like to preface this article with a tired, yet true, analogy. Security is like an onion, lots of layers. Nothing in here is intended to be a singular line of defense. For full coverage consider tools that provide protection on the user side of the house, including infosec training. Not to mention this just covers ransomware, there’s a whole lot more when it comes to security as a whole.
Take the bloody (snap)shot
ONTAP currently supports up to 1023 read only snapshots per volume with extremely low performance impact to take. The number of snapshots taken do not increase storage consumption, only change rate does. If your data changes 10% a day, you will need 10% more capacity per day (before efficiencies) regardless of how many snapshots are taken.
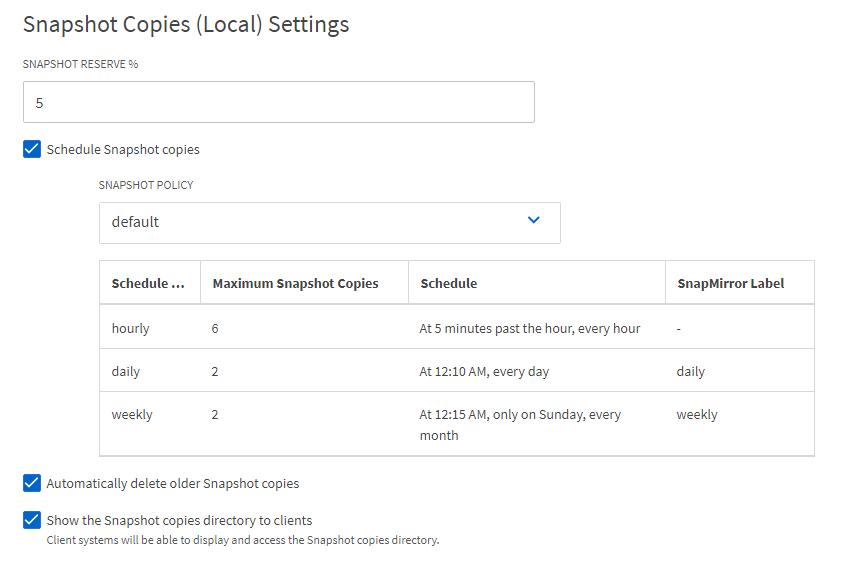
The default snapshot schedule six hourly, two daily, and two weekly. Is that enough?
Consider your SLA and the impact response of rolling back to a snapshot. With an hourly snapshot, at most you would only lose an hour’s worth of work following a quickly detected attack. But what if it takes a day or two for users to notice they’ve been compromised. Then you’re rolling back to your last daily, or maybe even weekly. Storage efficient snapshots mean you can take more with less impact – a feature you should 100% use to the fullest extent. Consider taking shapshots every 15 to 30 minutes, retaining those for several days. Keep daily backups at least 14 days. A few months of weeklies never hurt anyone either.
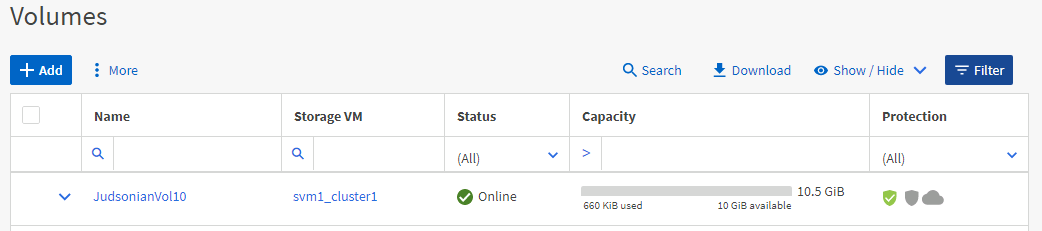
You can confirm snapshots are enabled by checking the volumes within System Manager. In the volumes window you’ll see a green checked shield (the first icon) if they’re enabled locally.
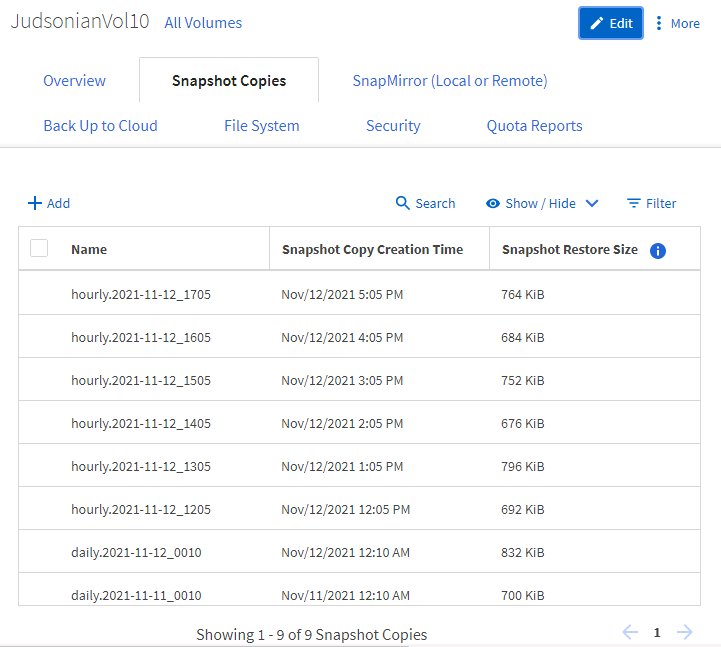
If you click into the volume, and go to Snapshot Copies, you can see how frequently they’ve been taken.
To edit the frequency, edit the volume and change the snapshot policy.
You can also get an idea of how many snapshots there are per volume via ActiveIQ. Navitage to the cluster, Cluster Viewer, the Storage tab, then expand out the volumes. Better yet, just hit the reports button up top and look through the Excel output.
A key indicator of attack can be rate of change in snapshot consumption and decrease in storage efficiencies. It’s recommend to implement ActiveIQ Unified Manager and setting email alerts for snapshot consumption (might as well set up other soft alerts like volume full and LUN offline).
Note to self, figure out how to do this.
Well, when I see 5 weirdos dressed in togas stabbing a guy in the middle of the park in full view of 100 people, I shoot the bastards. That’s my (F)policy
There are a lot of benefits to running Fpolicy on ONTAP shares including watching for suspicious activity (more on that later). An easy thing you can do now is simply implement Fpolicy to block known file extensions that are associated with ransom and other malware. This will essentially prevent the ransomware program from creating encrypted copies and, depending on how they coded the attack, cause a failure for the malware in the read-write-delete cycle.
First first thing you need to do is grab a list of possible ransomware extensions from sites like this or this (aka Google “ransomware extensions list 2021”).
Setting up Fpolicy is a matter of running a handful of commands…
Create the policy:
> set advanced -c off
> vserver fpolicy policy event create -vserver <SVM Name> -event-name <Event Name> -protocol cifs -file-operations create,open,rename
> vserver fpolicy policy create -vserver <SVM Name> -policy-name <Policy Name> -events <Event Name> -engine native -is-mandatory true -allow-privileged-access no -is-passthrough-read-enabled false
Configure the policy:
> vserver fpolicy policy create -vserver <SVM Name> -policy-name <Policy Name> -events event1 -engine native -is-mandatory true -allow-privileged-access no -is-passthrough-read-enabled false
Define the scope (blocked extensions)
> vserver fpolicy policy scope create -vserver <SVM Name> -policy-name <Policy Name> -file-extensions-to-include <Comma Separated List of Extensions> -shares-to-include "*" -is-file-extension-check-on-directories-enabled true
And Enable
> vserver fpolicy enable -vserver <SVM Name> -policy-name <Policy Name> -sequence-number 1
To check out the policy later you can run
> vserver fpolicy policy scope show -vserver <SVM Name> -instance
> vserver fpolicy show -vserver <SVM Name>
Earlier I referenced an Insight 2020 video that covers ransomware protection. In the video check out the demo at 28:34 for what happens without Fpolicy set up, and then at 37:00 to see what it looks like with Fpolicy enabled.
You can also twist things around and black list all extensions then whitelist approved ones (ala .doc, .pdf, etc). There are pros/cons to each scenario, essentially do you want to monitor known ransomware extension types or what your users are doing. More on whitelisting/blacklisting in this NetApp Blog by Matt Trudewind.
Protip! To defeat the Cyberdemon, shoot at it until it dies Document the extension blacklist and make sure your helpdesk team has a copy. Might help troubleshoot issues in the future if they encounter ransomware or users decide to start using random extensions.
Fpolicy, in a local to ONTAP sense, is only a part of the strategy. To get the most out of Fpolicy you’ll also want to monitor and watch for attacks in real time…
I’ve been equipped with an autonomous (anti-ransomware detecting), self-sustaining mobile holo-emitter. In short, I am footloose and fancy-free.
If you have the Security and Compliance License Suite for ONTAP you can leverage on-box anti-ransomware detection features. When enabled against NAS volumes, ONTAP will watch for changes to files and automatically take a snapshot if a potential attack is detected. It’s brand new with ONTAP 9.10.1, and you can find more information on how it works and how to set it up here: https://judsonian.com/content/intro-to-autonomous-ransomware-detection-and-mitigation-in-ontap-9-10-1-and-later/
The archives are comprehensive and totally (Cloud) Secure, my young Jedi
Where ONTAP has the ability to track file changes, NetApp’s Cloud Secure gives you the power to watch for attacks from the user perspective.
Cloud Secure is an additional module of Cloud Insights (one of my favorite tools) and integrates with fpolicy to track changes to the file system. If it starts to track abnormal activity, such as users deleting or encrypting files, it’ll throw a red flag, Taking a snapshot and sending out an alert email.
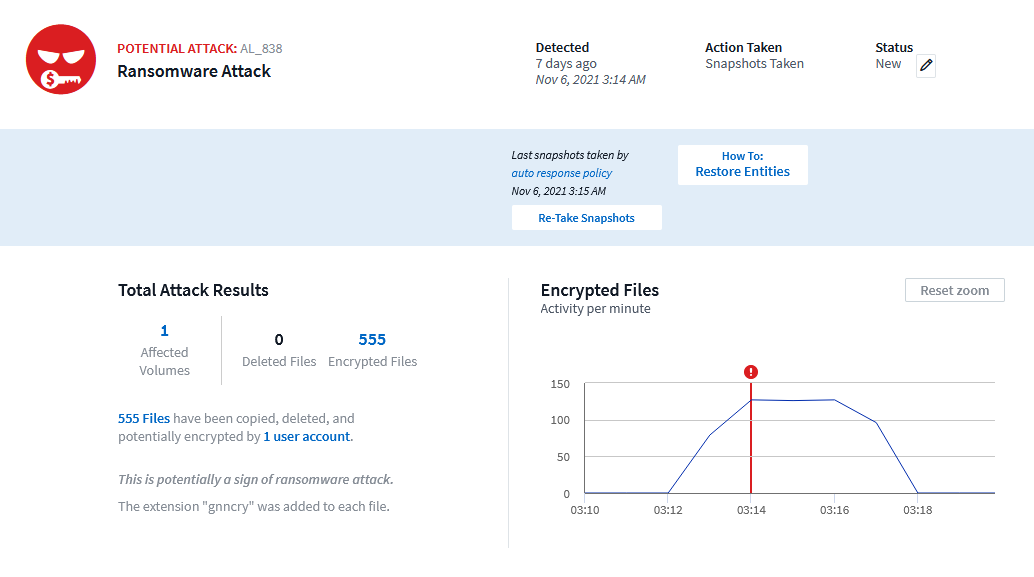
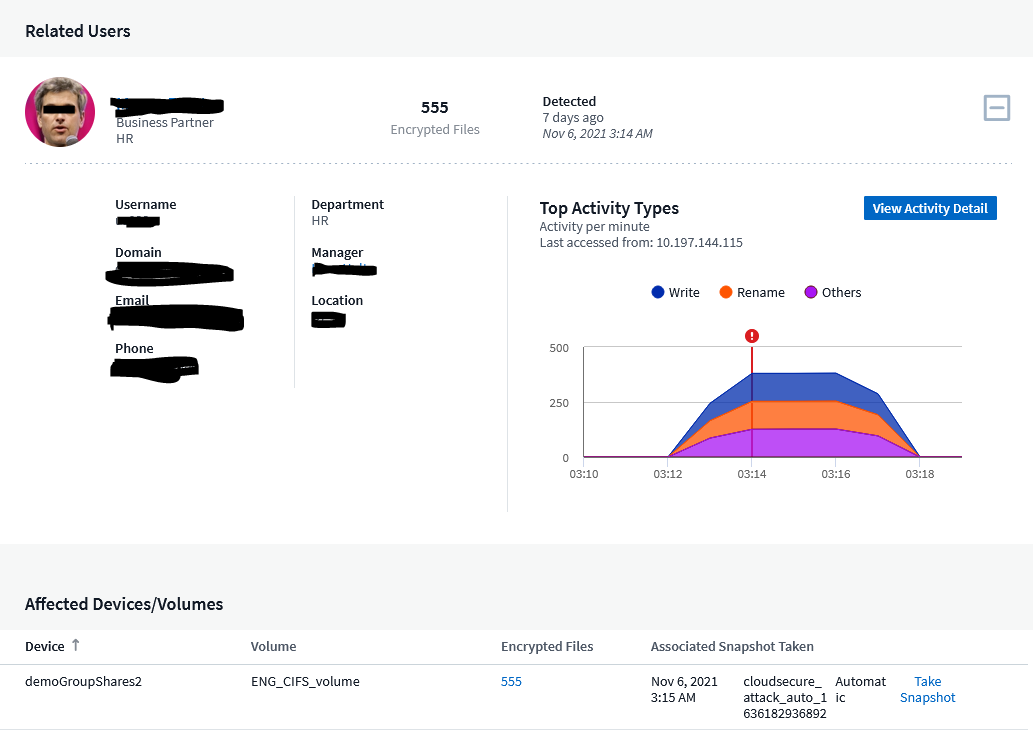
Alerts in Cloud Secure provide a lot of helpful information including the files and volumes effected, time and duration of the attack, and importantly the user account involved. This level of visibility is essential to quickly determining the vector of attack.
Cloud Secure also collects logs from multiple ONTAP environments at once, both on-prem and in the cloud, making detection and monitoring easy.
Lock one… lock two… lock three… (Snap) Loch Lomond…
Okay, you’ve prevented folks from messing with files on the system as much as possible. What about if someone were to gain access to the system’s admin credentials? Well that’s where SnapLock comes into play. SnapLock puts WORM (write once, read many) restrictions what actions can be taken to delete a snapshot.
Yeah, this is passed from the realm of a basic ransomware attack to “holy fuck they’re calling from inside the network.” But since this included in the previously mentioned Security and Compliance license bundle I figure why not cover it too.
Basically SnapLock has two operating modes, compliance and enterprise.
Compliance locks down the the entire SnapLock data aggregate until a predefined retention period has expired. If you set a 7-year retention policy, there’s no way to remove that data short of physically removing the drives.
Enterprise is a bit forgiving, as you can use a compliance administer account to perform pillaged delete of SnapLock data.
References
- Harden Your ONTAP Environment With The NetApp Ansible Security Role
- TR-4829, NetApp and Zero Trust – Enabling a Data-Centric Zero Trust Model
- SnapLock documentation
- Fpolicy details, with whitelisting and blacklisting practices (NetApp blog article)
Post Updates
- 11/16 – Initial publication
- 12/1 – Added a bit about Fpolicy black/white listing